14 DAY TRIAL //
 Virtual environments help prepare a product and ship it with minimum or no issues at all. Since this virtual space became a part of our daily lives, it too needs an isolated space for safe testing.
One of the common practices is running Windows in a virtual machine, which completely isolates it and all its running processes from messing around with your actual operating system. However, this requires careful balance of resources and heavy tweaking to perfectly simulate normal Windows running conditions.
Just like you probably found out from the web, Windows lets you create virtual hard disks to use for testing. They take up as much physical space as you define, with the possibility to treat it just like a regular partition. In addition, you can even install an operating system and boot it.
Creating a virtual hard disk drive
Step 1: Launch the Run utility and type diskmgmt.msc.
Step 1 (alternative): Right-click My Computer and select Manage.
Step 2: Under the Action menu, choose to Create VHD.
Step 3: Specify size in MB, GB, or TB. For a bootable OS, something around 22 GB will do.
Note: Always make sure there is enough free physical space, because the value you set is subtracted from it.
Step 4: Pick the VHD format, and Dynamically Expanding in case more space is required later on.
Step 5: Right-click the newly-created drive in the Disk Management utility, and choose to Initialize Disk.
Step 6: Right-click the corresponding unallocated space and select New Simple Volume.
Step 7: Follow the steps to Assign drive letter, and format it to make it functional.
Deploying Windows on the new VHD
Note: In order to go through with the operation, you need a deployment package (ISO file, or its content) for Windows. The file of interest is install.wim.
Step 1: Run Command Prompt with administrator privileges.
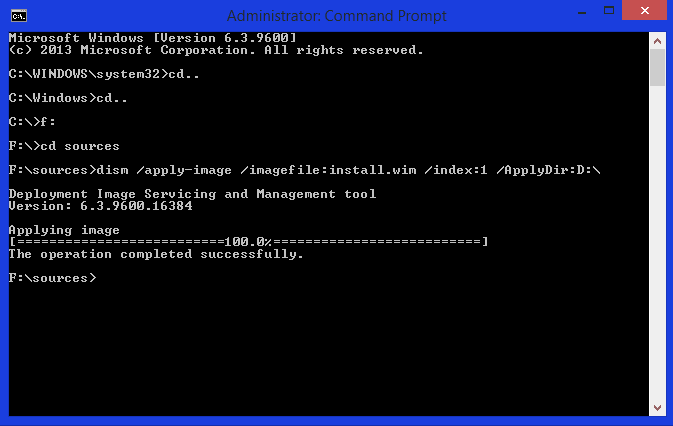
Step 2: Navigate to the location of dism.exe. It is located in the sources directory of the installer package. The input line should look like this F:\>sources>.
Step 3: Write the following command Dism /apply-image /imagefile:install.wim /index:1 /ApplyDir:D:\ .Note that in /ApplyDir:D:\, D is the VHD drive letter you assigned.
Step 4: Wait for the process to finish. When it’s done, the new Windows is ready to go on the VHD.
Step 5: Bring back the Command Prompt. Without changing locations (F:\sources>) type in bcdboot D:\windows. Again, D is the VHD drive letter.
This adds necessary boot files so, next time you turn on your computer OS, choices become available. Selecting the new one takes you through a common Windows setup process. The neat thing is you can take the VHD drive wherever you go.